Speed ramping is a trendy video effect that is being used a lot lately, both in YouTube videos and in major motion pictures. This effect is easy and consists of playing your footage at normal speed then quickly speeding it up to get to another portion of the clip or a new clip entirely. This is something that you probably don’t want to do often but in the right circumstances, it can really add some professionalism to your videos. This tutorial will show you how to speed ramp in Final Cut Pro but the same can be accomplished in other editing programs.
As Simple As A Shortcut
To start his effect, the first thing you need to do is load your clip into the timeline (obviously). Next, you want to choose where exactly you want to split up your clip. This is usually done in 3 segments but you can have as many speed transitions as you want!
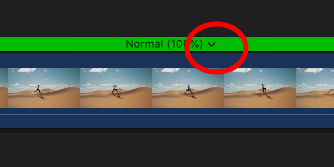
Find the first place in your clip that you want to add the speed ramp transition and hover your cursor over that spot. Next, you can easily use the shortcut Shift-B (not Command-B, that will cut the clip). This will divide your clip into two sections that now have a heading at the top of the clip that reads Normal (100%). This basically means these two clips will play at 100% or normal speed but now you get to change it. You will now see a small arrow pointing down next to the normal heading (pictured below).

If you click this you will see your speed options and this is where you can speed up or slow down the second portion of your clip. In this example, we will speed up the clip 8x times.

Now that the second segment of our clip is sped up, we need to add another segment that will slow it back down to normal. To do this, we will find the section we want to play at 100% and use the same shortcut, Shift-B. Then we will simply use the small down arrow icon to change it back to normal as seen below.

That is it! You have just done your first speed ramp. To see how this looks on a video, below shows a comparison between the original clip and the speed ramped clip.


