Many video editors, especially beginners, search the internet for hours trying to find the perfect transition to open their projects with. After all, the first 10 seconds of your videos are the most crucial with it comes to keeping your viewer engaged. With that begin said, some transitions can be created directly in your editor without using third-party plugins or other paid transition packs.
One of the most classic opening transition sequences is the cinematic black-bar reveal. This transition is perfect for any video opening especially those videos that have a more dramatic or calming reveal. In this tutorial, we will cover how you can achieve this simple yet powerful opening directly in Final Cut Pro X, Adobe Premiere Pro and any other video editor that has key-framing features. (Note: we will be demonstrating this technique in FCPX but the method is basically the same in other editors)
Step 1: Drag Your Clips Into Your Timeline
This is an obvious one but you will first need to drag your clips into your timeline. You can either drag all of your clips together or since this effect is meant for opening scenes you can just start off with the first clip of your project.
Step 2: Download the Adjustment Layer Plugin (Optional)
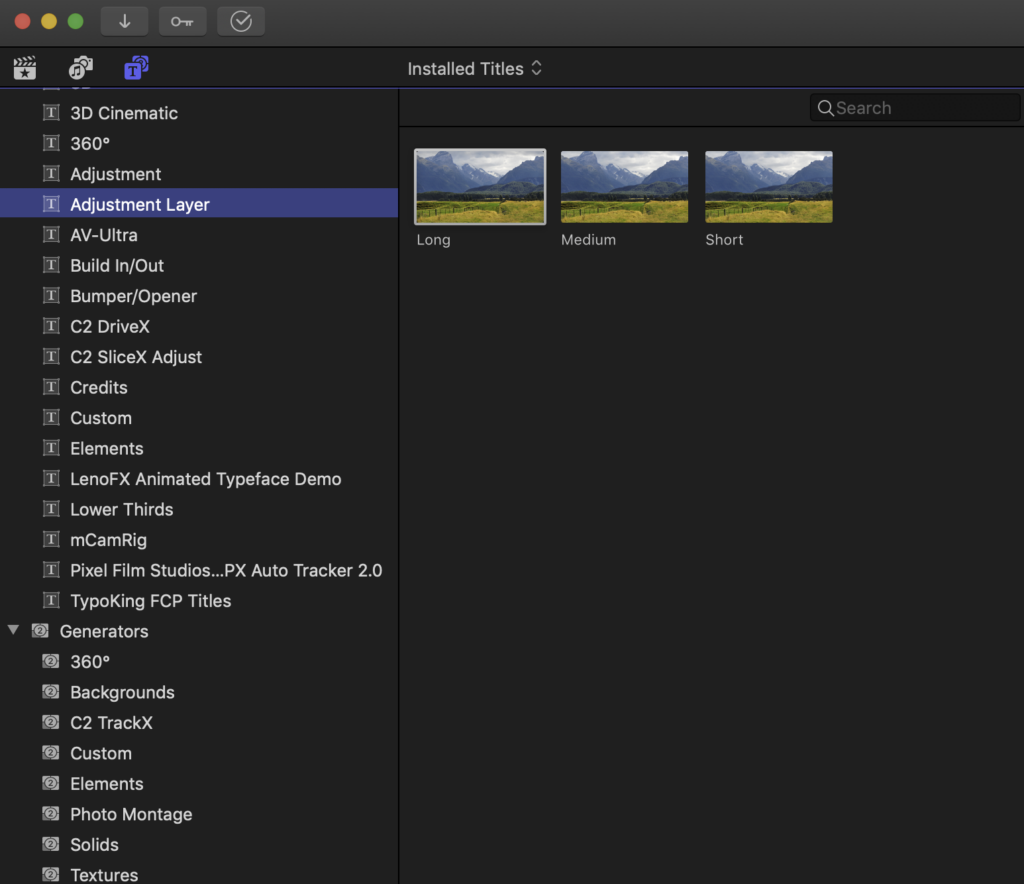
As mentioned at the beginning of this tutorial, you can certainly achieve this technique without using a plugin but I tend to use an Adjustment Layer to apply this effect. This is mainly because I don’t want to affect the clip directly and the Adjustment Layer allows you to add an effect but to a separate layer. If you would like to download this free Adjustment Layer plugin for Final Cut Pro X, you can click here. This was created by Ryan Nangle who is another fantastic editor.

Step 3: Adjust Crop Options and Add Beginning Keyframe
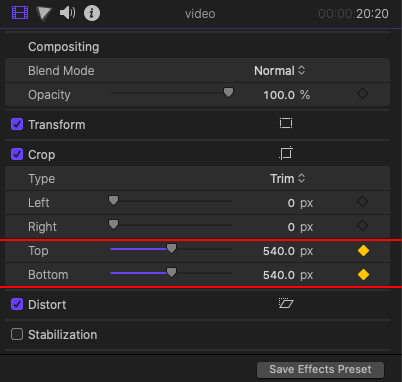
Place your playhead at the beginning of your clip and go to your Video Inspector. There you will see the Crop section. Expand that section if not done already and here you will only be playing with the Top and Bottom crop options.
Before we move any of these sliders we need to first determine your resolution. If you are editing a 1080p clip, you will need to move these sliders to a value of 540 on both the top and bottom sliders. If you are editing a 4K clip, you will need to move the sliders to 1,080 on both sliders. Basically, whatever resolution you are editing in, you will need to halve that on the height of your resolution. Once you have done this, you will essentially black-out your clip.
Next, you will need to create a beginning keyframe. You can simply do this by clicking on the diamond-shaped icon to the far right of the top and bottom crop sliders you just adjusted (shown below). The icon will then turn yellow.

Step 4: Reset Your Crop and Add Ending Keyframe
Now, that you have added your beginning keyframe, you will need to move your playhead to the spot in your clip where you want your video to be fully visible. The longer into your clip you add the effect, the longer the reveal will happen. Once you have your position, you will need to reset your top and bottom crop back to “0”. This should automatically create an ending keyframe to tell FCPX where you want this effect to end.
After you have done these steps you are all finished. You can play back your footage and you will see a dramatic and cinematic reveal to your clip. If you have done this using the Adjustment Layer method, you will have a little more freedom to fine-tune the effect but if you didn’t you can reset the keyframes and try again if you want the reveal to happen a bit faster or slower.


