Final Cut Pro is a fantastic product right out of the box but it is always good to know how to optimize it to make your editing faster and save time. In this article, we cover 5 easy ways to speed up your Final Cut Pro and edit faster.
Change to “Leave Files in Place”
Out of all these times I am starting off with this one as this is the tip I wish I learned when I started editing. So what does “Leave Files in Place” mean? Well, this setting in your Preference Menu tells Final Cut Pro to now copy each and every file into its auto-generated library file. This basically means that you will not have duplicate files stored on your hard drive which will save you a ton of space. The main drawback with this setting is that you will have to be more mindful when it comes to organizing your files.
To change this setting, click on the Final Cut Pro menu and choose Preferences and click on the Import sub-menu. Where it says Files, change the setting to Leave Files in Place instead of Copy to Library Storage Location.

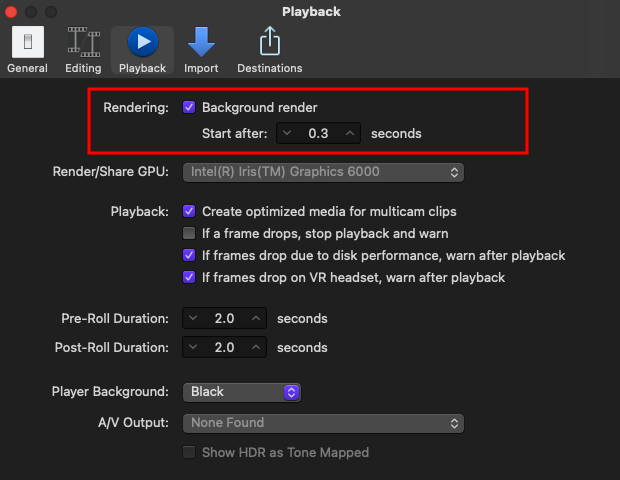
Turn Background Render Off
Background Rendering is a fantastic feature but, in my opinion, unless you have a ton of storage and a superpower machine, you might notice some slowdowns in Final Cut Pro. Basically, rendering is the process of creating temporary video and audio render files for segments of your project that Final Cut Pro can’t play in real time. This is usually needed when you add multiple video and audio effects to your projects. So why would you want to turn this off? Background Rendering can cause your computer to slowdown especially on larger video projects. Also, FCPX will continuously create temporary files that can fill up har drives quick. I recommend turning off Background Rendering and if you do happen to have sections that you need to render, you can manually render them as needed.
To turn this setting off, go to your Preferences menu and select the Playback menu. In the Render section, you will see that Background Render is checked by default. Simply uncheck it and you are good to go. Now, if you need to manually render a section of your project you can highlight it and go to Modify in your main-menu and choose Render Selection.
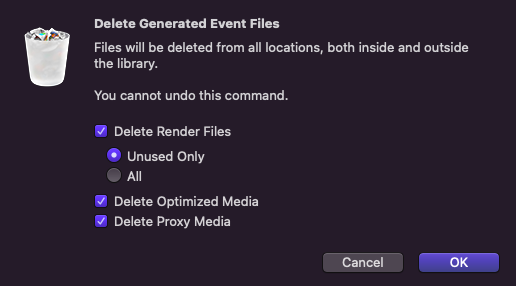
Delete Render Files
Remember those Render Files we talked about in the last step? This files are the most annoying thing about Final Cut Pro but thankfully there is an easy way to delete them. These files can quickly fill up your hard drives can cause tons of headaches so deleting them is a necessity.
To do this and delete these annoying temporary files, click on the Library that you are wanting to remove the files from, click File and select Delete Generated Event Files. This will bring up a dialog box with a few options of how much you want to delete. For my work and to save the most space possible, I choose Delete Render Files and select All, as well as checking Delete Optimized Media and Delete Proxy Media.
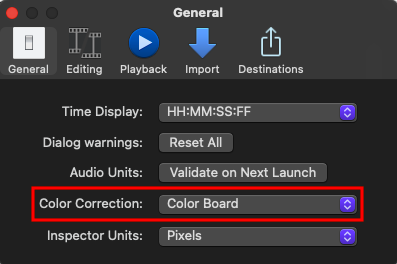
Change Default Color Correction
This might be one of the smaller adjustments on this list but overtime this can save you in a pinch when it comes to color correcting your videos. If you are like me and you prefer a specific color grading board by default this is the way to change it. By default Final Cut Pro sets the color grading panel as the Color Board. When I edit I actually prefer using the Color Curves. Instead of switching to the Color Curves every time I need to grade, you can change this in your Preferences. Simply go to the Final Cut Pro menu and select Preferences. Click on the General Tab and under the Color Correction drop-down, you can select whichever color grading system you like.
Use the Right Hard Drives
Choosing the right hard drives is also something to think about and it is typically overlooked. The absolute best types of hard drives to use are SSD or Solid-State Drives. Video editing requires a lot of read/write speed and Solid-State drives allow for much faster transfer speeds. Below are the two best SSD’s that I recommend when using Final Cut Pro for both desktop users as well as mobile users. These are the drives I personally use and out of the many that I have tried, these have never let me down.
Best Hard Drive for Desktop Editors
- Dual Thunderbolt 3 (20Gbps) ports and a single USB-C (5Gbps) port
- Enterprise-class 7200RPM Ultrastar drive inside
- Daisy chaining for up to 5 additional devices
- Powerful performance with up to 200MB/s read and 200MB/s write (1 MB/s = 1 million bytes per second. Based on internal testing; performance may vary depending upon host device, usage conditions, drive capacity, and other factors.)
Best Hard Drive for Portable Editors
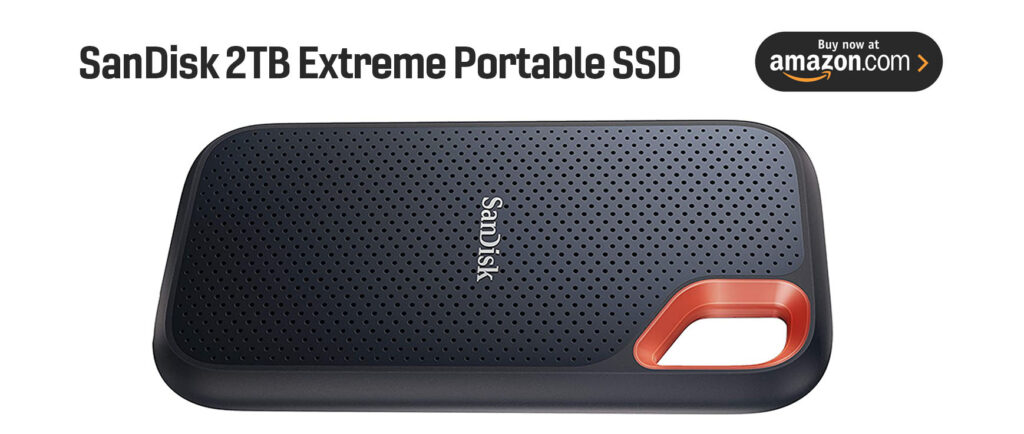
Even if you are a majority desktop editor it is always great to have a portable SSD to edit on. The SanDisk Extreme Portable SSD is your perfect companion. It offers:
- Get NVMe solid state performance featuring up to 1050MB/s read and up to 1000MB/s write speeds in a portable, high-capacity drive that’s perfect for creating amazing content or capturing incredible footage. (Requires compatible devices capable of reaching such speed. Based on internal testing; performance may be lower depending on host device, interface, usage conditions and other factors. 1MB=1,000,000 bytes.)
- Up to 2-meter drop protection and IP55 water and dust resistance mean this tough drive can take a beating.
- Use the handy carabiner loop to secure it to your belt loop or backpack for extra peace of mind.
- Help keep private content private with the included password protection featuring 256‐bit AES hardware encryption.


